Paleo Chocolate Chip Zucchini Muffins

We live in an interesting growing area. At high elevation, we can get frost and freezes that destroy our gardens if we are not careful. In fact, that actually happened to our tomato plants at the start of the season.

We’ve also gotten a lot of rain this year, like torrential rain. While the streets and flood zones from the fires did not necessarily appreciate that, my garden sure did.

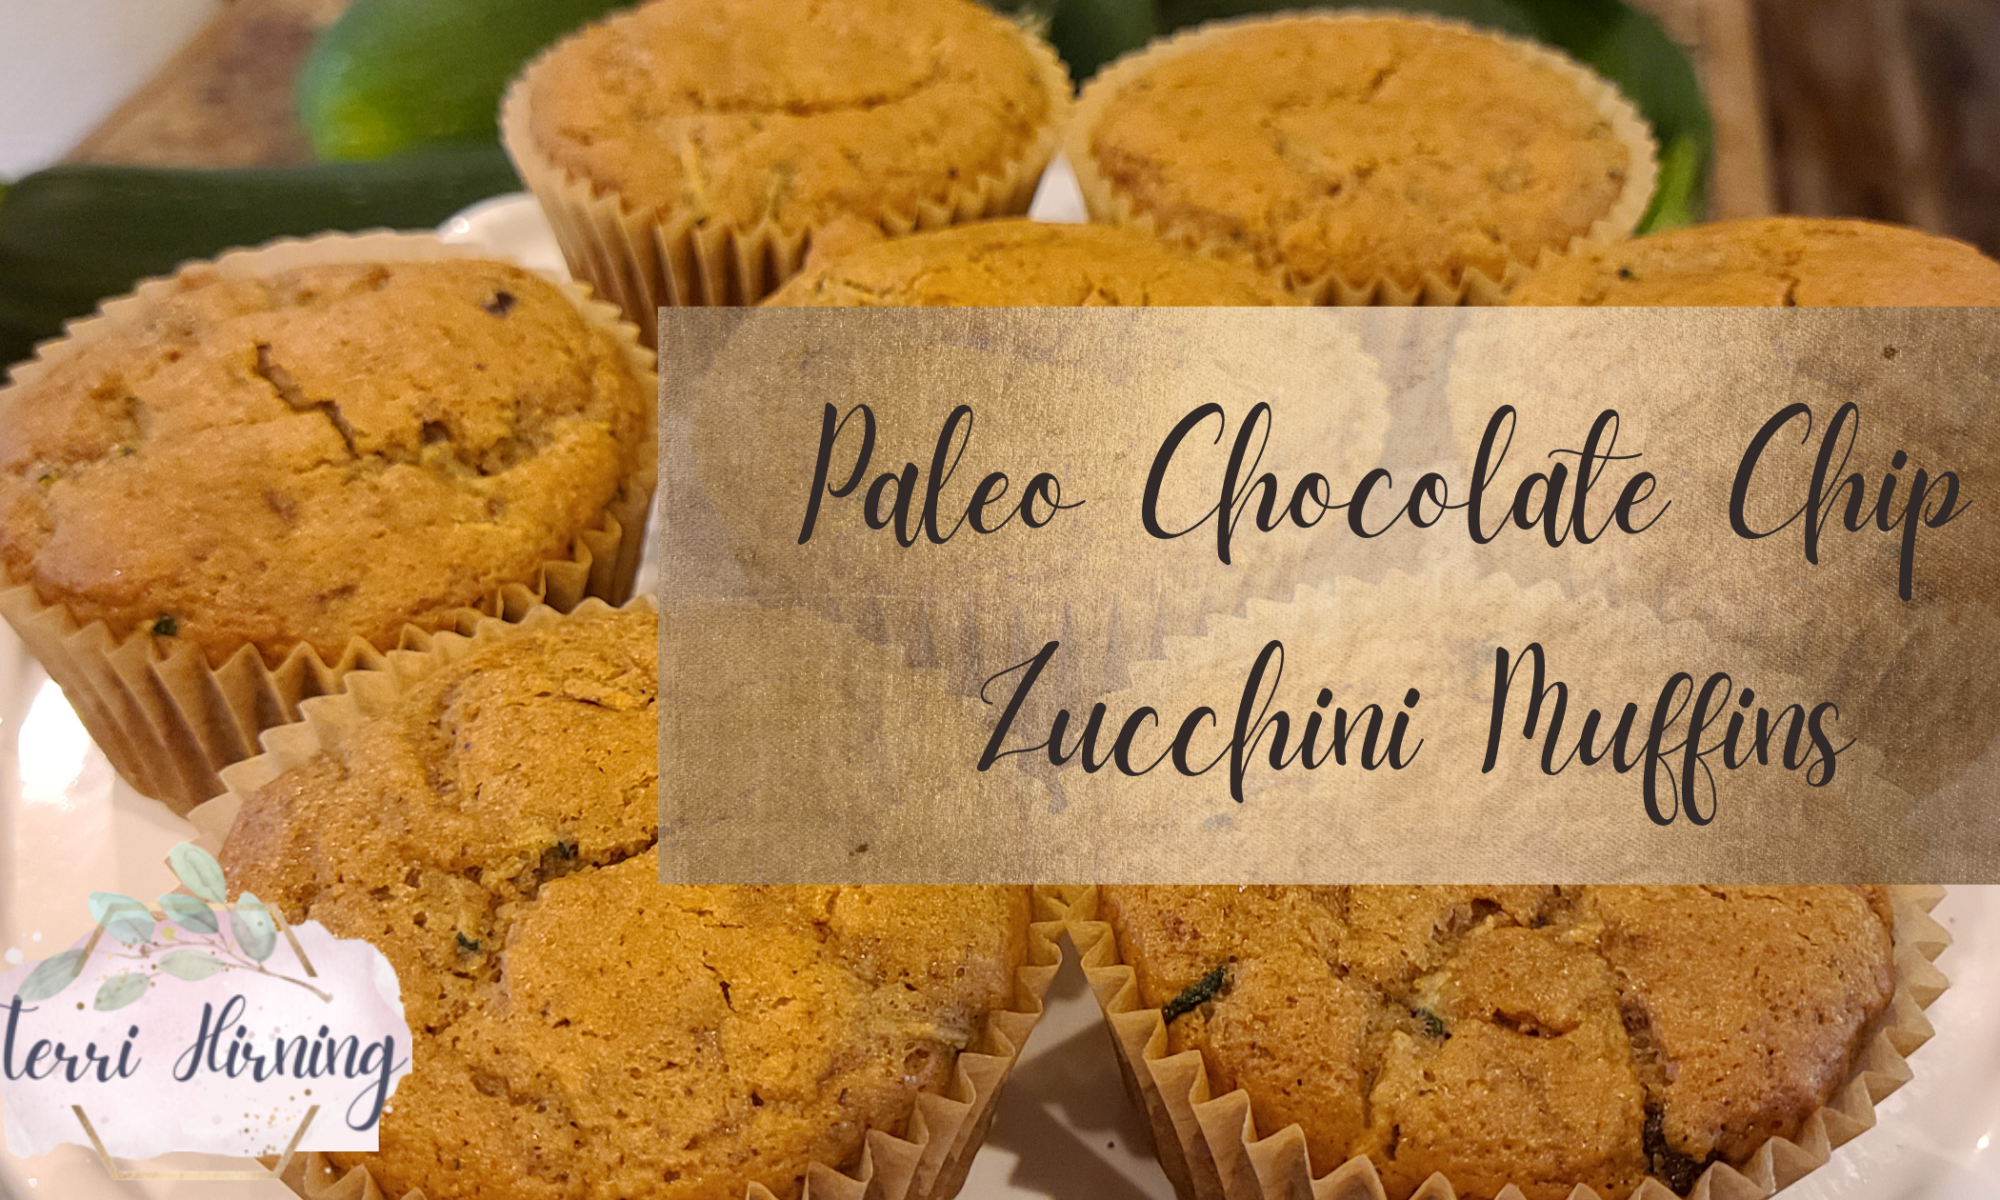
As such, we have 1 zucchini plant that is producing prolifically. In fact, it seems each time we go out and look, we have another huge zucchini ready to be picked!

That means zucchini-everything around here.

I wanted to make zucchini bread although I don’t like to make breads as much as I like to make muffins.

Muffins are easier to cook (less time baking) and I feel like they are more moist as a result of the reduced baking time. And, these are perfect portion sizes where with breads, I am more likely to keep nibbling and not pay attention to exactly how much I am eating.

So if your garden runneth over with zucchini, this can be a great way to get it into even your most veggie-resistant child. Note, these are not necessarily low sugar. You can play with alternatives like maple syrup or swapping out some of the sugar for stevia. You could also use Lily’s Stevia Sweetened Chocolate Chips which are also allergen friendly as a way to cut down the sugar.

Disclosure: I am an Amazon affiliate and as such, the links below are affiliate links. This means that, at zero cost to you, I will earn an affiliate commission if you click through the link and finalize a purchase.
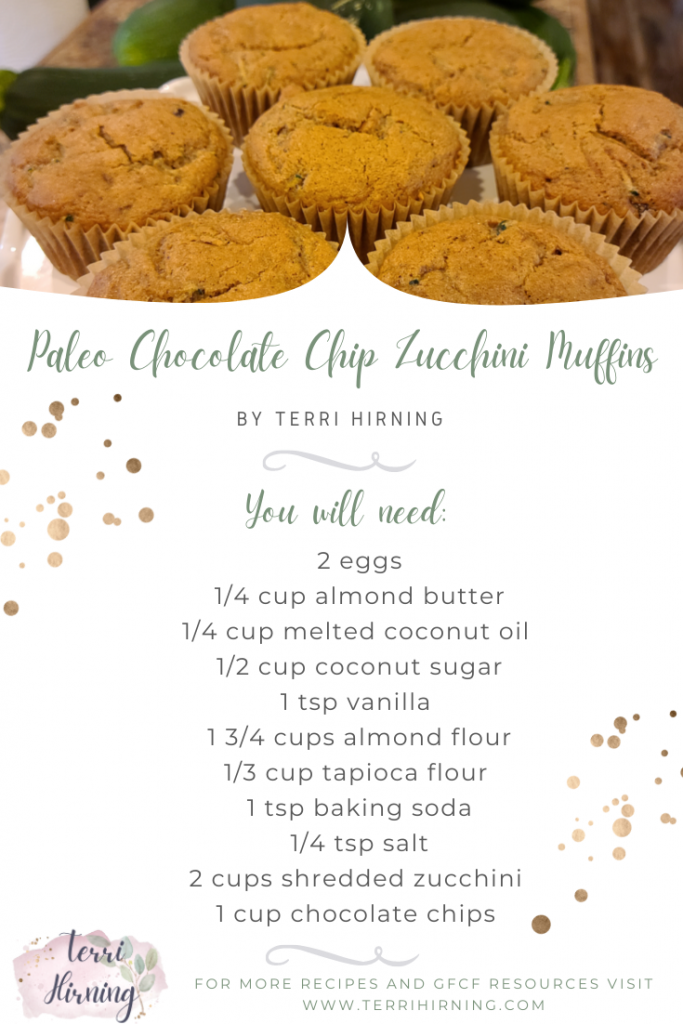
You will need:

2 eggs (preferably at room temperature)

1/4 cup almond butter

1/4 cup melted coconut oil

1/2 cup coconut sugar

1 tsp vanilla

1 3/4 cups almond flour

1/3 cup tapioca flour

1 tsp baking soda

1/4 tsp salt

2 cups shredded zucchini

1 cup chocolate chips

Instructions:

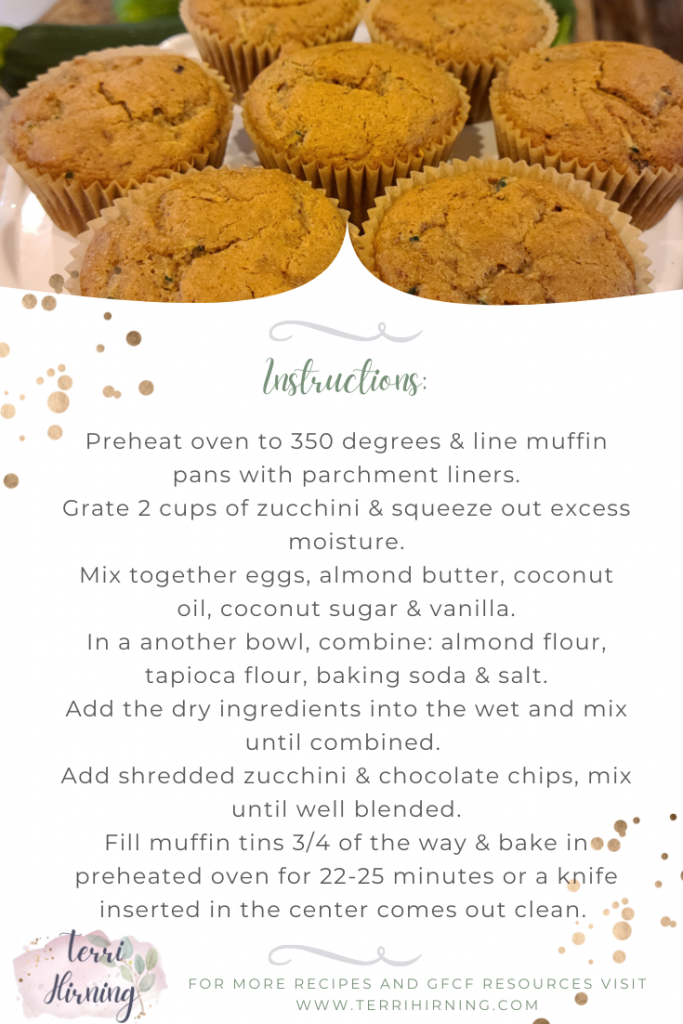
Preheat oven to 350 degrees Farenheit .

Line your muffin pans with parchment liners.

Grate 2 cups of zucchini then pour onto a clean kitchen towel, roll up and squeeze the excess moisture out. Unroll the towel and allow the zucchini to dry out further on the counter while you begin making the batter.

In your stand mixer, mix on low eggs, almond butter, coconut oil, coconut sugar, and vanilla

In a another bowl, combine the dry ingredients: almond flour, tapioca flour or arrowroot, baking soda, and salt.

Add the dry ingredients into the wet and mix on low until combined. The zucchini adds a lot of moisture so don’t worry that your batter looks thick at this point.

Add your shredded zucchini and chocolate chips, mix until well blended.

For ease and precision, I use an ice cream scoop, to fill muffin tins. But you can use a spoon or spatula to fill them 3/4 of the way. I got 16 muffins out of this recipe.

Bake in your preheated oven for 22-25 minutes or a knife inserted in the center comes out clean. Allow to cool and enjoy!

Gluten-Free, Dairy-Free Peach Dump Cake

Have you ever made a dump cake? I will be honest, I had never even heard of a dump cake!

But, when I found myself hosting impromptu guests for dinner, I wanted to have a delicious dessert to end our meal.

That’s when I found out about dump cakes.

They are notoriously easy to make, you do just what the name implies, dump everything into a baking dish. Seriously.

And what is better in summer than something with peaches?!?

You will need:

45 – 60 oz peaches (canned, fresh, or frozen)

1 tbsp organic cornstarch

1 tsp cinnamon

1/2 tsp nutmeg

1/2 cup coconut oil (hardened)

1/2 c sugar

2 tsp baking powder

1/4 tsp salt

1 1/2 gluten-free flour blend – don’t have one you love? Here is my recipe that I use.

1/4 cup brown sugar

Instructions:

Preheat oven to 375 degrees Fahrenheit.

Lightly grease a 9×13 pan with coconut oil.

Place peaches into the greased pan. Toss with cornstarch, cinnamon, and nutmeg.

In a mixing bowl, stir together flour, sugar, baking powder, and salt until well mixed. Sprinkle over the top of the peaches evenly. Sprinkle brown sugar on top.

Use a cheese grater or 2 knives to roughly grate the hardened coconut oil. Sprinkle grated oil over the top of the cake mix layer.

Bake 35 to 40 minutes, until golden.

Helpful Tips:

You can use fresh, frozen, or canned peaches. I used organic canned peaches in pure juice. Syrup will provide additional sugar content to the recipe so beware. You can rinse off canned peaches that have been canned in syrup for better results.

I drained some of the cans I used but I didn’t drain them all. I found that the liquid helped make the cake not so dry.

If you are using frozen peaches, let them thaw at room temperature for about 30 minutes prior.

The nature of dump cakes make it hard to spread the flour mixture evenly. If you have high spots, they may not mix with liquids and remain raw. I used the back of a spoon so smooth out the high spots and make the cake even. That’s where the juice from the peaches came in handy. If you notice dry spots while baking, use a spoon to flatten it out so it can absorb some liquids. 

The great thing about this recipe is that you can swap the fruit for ones that work for your needs / allergens / intolerances. Just be mindful of the liquid content and plan / adapt accordingly. I made this with pineapple also and it worked great. Berries would probably work as well but you may find you need to add more liquid.

I hope you enjoy!

My Favorite Gluten-Free Flour Blend

If you cook or bake gluten-free then you know the importance of a great flour blend.

When I look at recipes, I focus on what we want to eat and convert the recipes as needed.

Eating gluten-free or dairy-free shouldn’t hamper what you can or can’t eat.

Now, this is coming from a person who is down the road on a gluten-free, dairy-free, and soy-free diet for over 15 years, it wasn’t always so.

I used to eat based on what was available for my son. It took years to have the confidence to recreate family favorites or new recipes I wanted to try.

Which is exactly why I am sharing this information with you. I want others to have an easier time of it than I did.

So, here is my blend for a terrific 1:1 flour mix that has worked great for me for many years.

Recipe:

Gluten-free Flour Blend

You will need:

1 c rice flour

3/4 c tapioca starch

1/4 c sorghum flour

1 tsp xantham gum

Mix all together and store in an airtight container in a cool place. Use as you would any flour for recipes.

Enjoy and if you use this blend in your cooking or baking, I’d love to hear how it goes for you so please post in the comments below.

Chocolate Peppermint Muffins

Muffins. How do I love thee? Where to begin…..

When my son was younger, getting him to eat was a challenge. There were texture issues, sensory issues, food avoidance, food cravings (mostly wheat and dairy products), did I mention food avoidance?

Meal times were more like a war zone honestly.

Until……I mastered the muffin!

When he was little, that meant mini-muffins. I packed as much dense nutrition into the muffin as I could. I made muffins of many flavors, textures, and yes even colors (all natural of course, one funny one came from the chemical reaction between sunflower seeds and baking soda!) I made muffins out of meat, muffins out of veggies, fruits, you name it!

As my kids got older, muffins remained a great way to get good nutrition into them in a form they loved that was easy.

Then I went to batch cooking and I would make double or triple batches of them – for the same amount of time spent – and it would feed them for days. They store nicely in the freezer and can be reheated easily. I use parchment liners which make baking and storing (even double layers on top of each other) a breeze.

Chocolate Peppermint Muffins are a favorite in our house.

These freeze well. As a matter of fact, I almost always have some in the freezer.

They have almost 1/2 egg per muffin and I cut the sugar and replaced with some stevia so there is no loss on sweet but it is not overloading them with sugar at the same time. They are gluten, dairy, soy and grain free.

Note, this recipe does call for either peppermint essential oil (1 drop) or peppermint extract. Before ever cooking with or consuming essential oils, always check with your physician on whether this is appropriate for you and your children. In lieu of that, switch to peppermint extract or simple leave out and just enjoy the chocolate flavor!

Want a downloadable version? Click here to get for one that is easy to print or save.

Comment below when you make these and tell me how you and your family like them!

Amazon Disclaimer:

Terri Hirning is a participant in the Amazon Services LLC Associates Program, an affiliate advertising program designed to provide a means for sites to earn advertising fees by advertising and linking to Amazon.com. At no additional cost to you, if you purchase certain items linked in this site and blog, she may earn an affiliate commission on certain products. She only links to products she uses and has experience with directly.

FTC Disclaimer:

Some links may be affiliate links. We may get paid if you buy something or take an action after clicking one of these.